Create Office 365 mailboxes while On Premise mailbox still exists
There are situations in which you want to create a office 365 mailbox on a AD synchronized account that still has an on premises mailbox. For instance when using 3rd party migration tools that require the office 365 mailbox to exist. Normally when assigning a office 365 exchange license to a user a mailbox is automatically created. When this user still has an on premises mailbox office 365 will not create a mailbox. A mailbox will only be created when the microsoft migration tools are used. Office 365 checks the existence of the msExchMailboxGuid attribute to determine whether an on premise mailbox exists.
PERFORM THESE STEPS AT YOUR OWN RISK!
We can alter the directory sychronisation so that the msExchMailboxGuid is no longer synchronised to Office 365. This can be done by performing the following:
- On the computer thats running the directory synchronisation tool.
- Navigate to C:\Program Files\Microsoft Online Directory Sync\SYNCBUS\UIShell
- Launch the application miisclient.exe
- Click on the management agents tab
- Open the properties of the Active Directory Connector
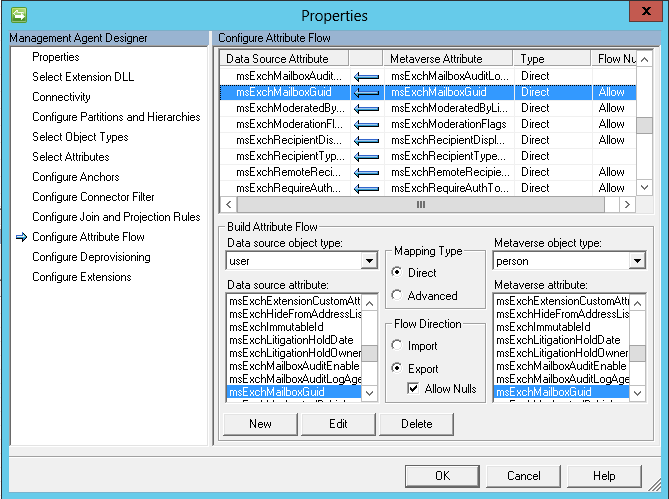
- Go to Configure Attribute Flow
- Expand Object Type: user in the Configure Attribute Flow section
- Scroll down to msExchMailboxGuid
- Click the Delete button to remove the mapping
- Click Ok to save the changes
If you already have synchronized objects in Office 365 these will still have the msExchMailboxGUID populated in Office 365. Since there is no way to use ADSIEdit on Office 365 objects we will have to do this with the directory synchronization tool.
The Azure Directory Synchronization tool is actually an installation of FIM (Forefront Identity Manager). I will not go into the specifics of how FIM works in this article but I will explain how to remove the msExchMailboxGUID value. FIM uses a metaverse to store the objects and attributes that are synchronized to Office 365. The metaverse is stored in a SQL database. We have removed the msExchMailboxGUID from the Active Directory Connector so it no longer populates the metaverse however for existing objects the value is still populated and will need to be removed. To do so follow these steps on the computer that’s running FIM:
- Install the SQL Express admin studio.
- Perform the following query:SELECT userPrincipalName, msExchMailboxGuid
FROM mms_metaverse
WHERE (msExchMailboxGuid IS NOT NULL)This should return the user objects that still have the msExchMailboxGUI attribute populated. - Perform the following Query to remove the msExchMailboxGUI from all users:
UPDATE mms_metaverse SET msExchMailboxGuid = NULL WHERE (msExchMailboxGuid IS NOT NULL) - Now that this is done we need to synchronize the changes to Office 365.
- Navigate to C:\Program Files\Microsoft Online Directory Sync\SYNCBUS\UIShell
- Launch the application miisclient.exe
- Click on the management agents tab
- Right-click on the Windows Azure Active Directory Connector and click Run.
- Perform a Full Import Full Sync.
- When the Full Import is finished perform an Export.
- Assign licenses to the accounts in Office 365. This should create the mailboxes.
This completes the procedure. Make sure that if you have to reinstall the Directory Sync tool onto another system to apply step 1 to 10 before running it.
